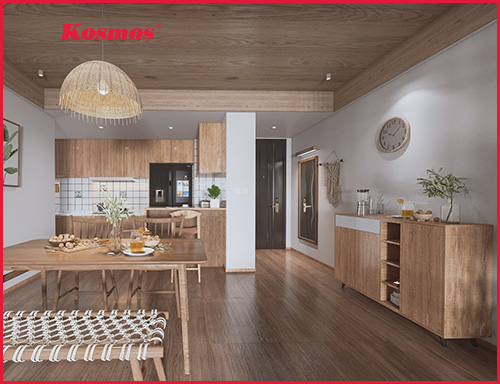
Newsletter plastic wall panels
Instructions for installing Nano panels directly on beautiful walls
Tips to help the project Construction of Nano panels Directly on the wall has durability / beauty that lasts with time in the article below!
B1 Prepare tools to construct Nano panels
Nano Panels constructed with the following tools:
- Stainless steel keel.
- Stainless steel screws or nails.
- Iron hammer or screwdriver.
- Kosmos glue bottle.
- Measuring tools: laser meter, ruler, ..
- Cutting tools: Hand-held cutters, pulleys, ..
- Marking tool: Pen or ink string.
- Panel accessories: molding, splint.

B2 Renovating wall surfaces with Nano panels
The wall of the house is very easy to degrade if there are no measures to prevent moisture. The condition of peeling, mold, cracks on the wall surface will adversely affect the life of the panel if we do not find a way to handle it before installation.

How to renovate a flat wall
If the wall surface is peeling, we need to remove all the rough crust on the wall surface by scraping. After that, we proceed to smooth the wall surface more flat. Finally, we paint a layer of primer (preferably waterproof paint) on the wall surface.
We can use plaster to improve the uneven condition of the wall. In case the wall surface is too rough, we should fill the foundation with cement mortar.
B3 Measure and cut Nano panels to the required size
We can easily cut Nano panels with a paper cutter. However, in locations that require meticulousness such as electrical outlets, we should use a handheld cutter to fine-tune.


B4 Apply glue to the back of the Nano panel
Construction of Nano panels It is required to use specialized glue (Kosmos Glue). We will apply it in a zigzag pattern so that the glue layer is evenly spread when pressed against the wall.
Note: The glue layer must be located a small distance from the edge to avoid the glue spilling on the surface.

B4 Fix the Nano panel directly to the wall via screws and stainless steel screws
To fix the Nano panel on the wall, we must use more Stainless steel keel. This is an accessory to be used by attaching wall paneling. With stainless steel screws, we will fix the keel and the panel on the wall. If you do not use stainless steel screws, you can still fix the keel by driving nails.
Note: 1 panel is about 3m long, it takes about 6 kegs. Using less can cause the plate to creak and become unstable. If it's more, it's a waste.

B6 Install the remaining Nano panel
Nano panels are assembled together with locks. When installing the positive seam into the negative seam of the panel, we will cover both the nails and screws, even the joints will not be clearly seen, ensuring the highest aesthetics for the project.

For areas where the wall is higher than the length of the panel, it is necessary to perform a panel connection.
- The trick for constructing Nano panels without revealing seams is to cut them straight or at an angle 30 degrees.
- The trick to installing Nano panels at a right angle is to cut the panel at an angle 45 degrees.
B7 Complete the Nano panel construction project with accessories
Decorative accessories for the construction of plastic wall panels
- Pointing the back of the wall: installed in the center of the wall.
- Skirting: install the position adjacent to the floor.
- Bare neck: install ceiling position.
- Ending: edge cover mounting, mounting end position.
- End brace: similar to the end molding (designed according to each pattern).
- Negative angle brace: mounting in the inner corner or in the middle of the wall as a wall only.
- VU corner brace: outside corner mounting, 90 degree perpendicular position.
Note: You should choose accessories that match the same model or color to increase the aesthetics. PVC fittings are installed with special glue.
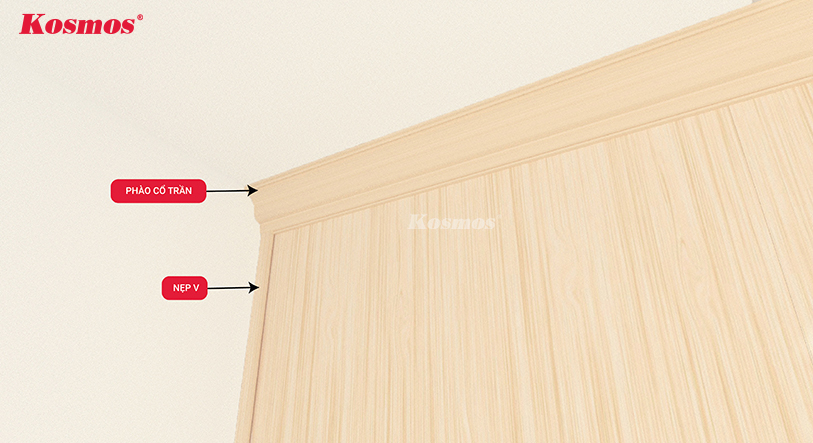 Install molding and splints at the edges of Nano panels.
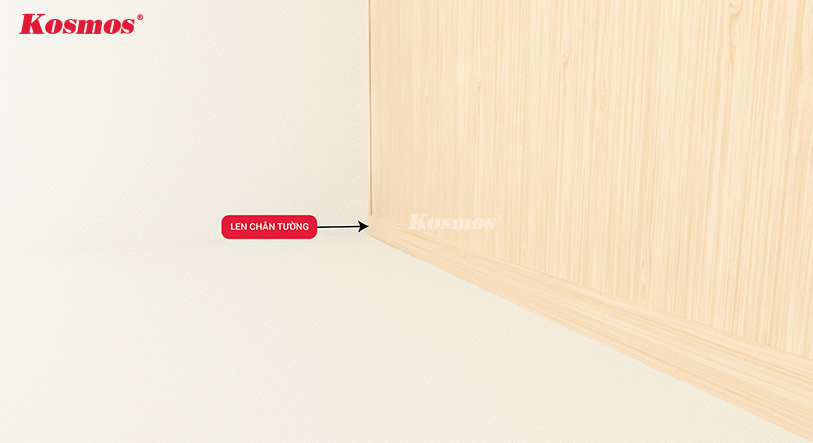 Install skirting boards for Nano panels.
Construction of Nano panels directly on the wall requires us to invest a lot in the wall renovation process. Otherwise, you can install the panel on the skeleton. Any problems during construction can be solved via Hotline: (+84) 903 093 221. Kosmos Vietnam will answer all your questions as soon as possible!

Kim Hoa is an expert in interior and exterior decorative materials at Kosmos Vietnam. She has professional knowledge of interior design and loves finding creative ways to optimize space with simple construction decoration materials such as wood, stone, bamboo, brick and plastic.
Kim Hoa Regularly participate in seminars and exhibitions on interior decoration materials to update the latest trends, as well as to learn more about interior decoration materials. Meet interior and exterior designers, architects, and material experts to continuously learn. She also actively shares her knowledge and experience on social media channels such as Facebook, YouTube, Tiktok... with more than 100 thousand followers.
Mission of Kim Hoa not merely providing information, but also ensuring that All information posted is quality, has in-depth investment and is most useful to viewers.
- Instructions on 6 steps to properly install bamboo charcoal panels for walls and ceilings
- The most diverse and beautiful images of PVC wall panels
- The latest types of PVC wall panels today
- 5+ types of cheap and durable plastic wall and ceiling panels
- Quote the best 6 types of laminate flooring and construction notes
Related articles of interest:
- Galawood plastic wood newsletter
- Kosmos plastic wood newsletter
- Newsletter Kosmos
- Korean Wave Newsletter
- Newsletter fluted panel Kosmos
- Korean molding news
- Stone PVC Newsletter
- Laminate flooring newsletter
- Egger laminate flooring newsletter
- Galamax laminate flooring newsletter
- Kosmos laminate flooring newsletter
- Povar laminate flooring newsletter
- Robina Flooring Newsletter
- Newsletter Thaixin laminate flooring
- Plastic floor newsletter
- Newsletter plastic wall panels
- Newsletter of bamboo charcoal panels
- Bulkhead newsletter
- agents
- Accessories consultation
- Wiki - Interior and exterior trends