Kosmos plastic wood newsletter
8 steps to construct outdoor plastic wooden slats
To Construction of outdoor plastic wood bar standard, please take a look at the step-by-step instructions from the total warehouse of wood plastic Kosmos Vietnam. With more than 10 years of experience in the field of supplying decorative materials, Kosmos warehouse will convey information that is easy to understand and easy to install.
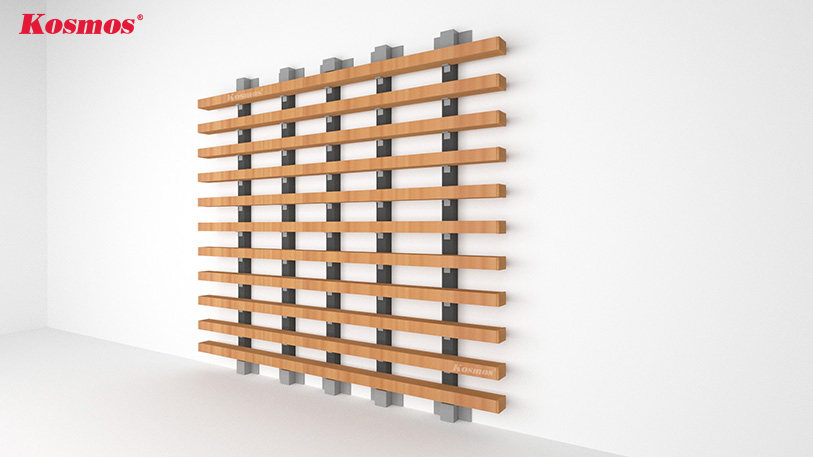
Outdoor plastic wooden slats are a bar-shaped product with a hollow core for inserting stainless steel/galvanized iron bars. Because they are made from plastic wood (WPC), they are highly durable when installed in outdoor spaces, without worrying about termites or moisture.
The 2021 study published in the Journal of Civil Engineering (ScienceDirect) evaluated the mechanical properties of WPC under a variety of environmental conditions. Research indicates that WPC has low moisture content, relatively low swelling and water absorption, making the material suitable for applications in both indoor and outdoor environments.
To install plastic wooden slats on the wall, we need to follow these steps:
- Step 1: Prepare tools and construction materials.
- Step 2: Install the frame using stainless steel bars/galvanized iron bars on the wall (distance between bars ≤500mm).
- Step 3: Insert the galvanized iron bar into the core of the plastic wooden bar.
- Step 4: Cover the two ends of the plastic wooden bar
- Step 5: Fix the bar onto the frame with stainless steel screws and screws

B1 Prepare tools and materials to construct plastic wooden bars
Tools for constructing outdoor wooden and plastic wall panels include:
- Measuring instruments (laser meter, ruler, ...)
- Cutting machines
- Drill
- Screwdrivers

The materials used to install the plastic wood bar include:
- Galvanized iron bar or 304 stainless steel to make the frame (thickness not less than 25mm).
- The galvanized iron bar has a size suitable for the bar core.
- Plastic wooden bars.
- Plastic wooden head cover (if any).
- U-shaped stainless steel plate.
- L-shaped stainless steel keel.
- Stainless steel screws.

|
Galvanized box iron bar size detection table |
||
| Kosmos plastic wooden slats | Bar core size (mm) | Size of galvanized box iron bar (mm) |
| LAM160X80 | 105 x 52 | 50 x 100 |
| LAM105X50 | 32x 31 | 30 x 30 |
| LAM60X40 | 48 x 27 | 20 x 40
25 x 25 |
| LAM50X50 | 37 x 37 | 35 x 35 |
| LAM80X40 | 53 × 28 | 50 × 25 |
| LAM35x35 | 24 × 24 | 20 × 20 |
Based on the measurements on the drawing, we will measure and cut the bar, galvanized iron bar according to the size needed.
B2 Install the skeleton on the wall
Please use a laser meter to accurately mark the position where the skeleton needs to be installed. The distance between the bone bars is not more than 500mm (50cm).
We have to align the bone bar evenly, straight and flat with a laser meter, and then fix the two ends of the bar to the wall with U-shaped stainless steel plate and bolts. Specifically, we will use a drill to transplant into the concrete wall. Next, we will fasten the bolt to the stainless steel bowl and tighten it.

Depending on the project, you will choose for yourself the most suitable type of stainless steel pot. In addition, you should use specialized iron expansion bolts to ensure that the structure of the building is kept stable throughout the years of use.
In addition, to make the work more solid, you can weld stainless steel to the skeleton (welds must be flat and smooth).
B3 Thread the galvanized iron bar into the core of the plastic wood bar
We insert the galvanized iron bar inside wood-plastic bar to increase the durability and hardness of the project. Both will be tightly fixed together with stainless steel screws. However, in this project, the bar will be attached to the through frame keel L. Therefore, you can perform this stainless steel screw shooting operation through the screw.
Note: The position of the L-kick must correspond to the skeleton on the wall.


B4 Cover the 2 ends of the plastic wooden bar
To improve the aesthetics and prevent dirt and insects from entering the core of the bar, please seal the 2 ends of the bar with a lid or stick the plastic wood piece with glue manually.
- Step 1: Insert a small piece of pine wood into the top of the cage and nail it in place.
- B2: Cut a piece of plastic wood from the bar itself to cover the top, secure with nails and iron glue.
- Step 3: Apply sawdust to the crevice (where the glue is) and then sand.
See more: Video tutorial for sealing the plastic wood bar

B5 Fix the bar onto the frame with stainless steel screws and screws
We install the outdoor plastic wooden slats onto the frame based on the original design drawing. To make the project even and straight, please mark the mounting position before fixing the bar with L-shaped stainless steel brackets and stainless steel screws.

Complete all 5 steps above and you have completed the project installation outdoor plastic wooden slats Already. The final step to hand over the project to the homeowner is to clean the installation area thoroughly.
Note: Instructions are for reference only. To have the most suitable construction plan, it is necessary to survey the specific project and come up with an optimal construction solution.

>>> Watch more video instructions for constructing outdoor plastic wooden slats to make sunshades:
If you have any questions about the installation steps, Construction of outdoor plastic wood bar You can leave your information in the section contact or immediately call the Hotline number: 0903 093 221. Kosmos Vietnam consultants will answer you immediately.
Kim Hoa is an expert in interior and exterior decorative materials at Kosmos Vietnam. She has professional knowledge of interior design and loves finding creative ways to optimize space with simple construction decoration materials such as wood, stone, bamboo, brick and plastic.
Kim Hoa Regularly participate in seminars and exhibitions on interior decoration materials to update the latest trends, as well as to learn more about interior decoration materials. Meet interior and exterior designers, architects, and material experts to continuously learn. She also actively shares her knowledge and experience on social media channels such as Facebook, YouTube, Tiktok... with more than 100 thousand followers.
Mission of Kim Hoa not merely providing information, but also ensuring that All information posted is quality, has in-depth investment and is most useful to viewers.
- Construction price for 5 types of beautiful gold-plated stainless steel plaster ceiling braces
- Is 304 stainless steel wall corner brace good? 2 types and correct installation methods
- Review: Is the stainless steel splint good? Price list and popular sizes
- INOX 304 – Concepts, classification, characteristics and applications
- Quotation for U-shaped stainless steel braces according to 9 sizes and installation methods
Related articles of interest:
- Galawood plastic wood newsletter
- Kosmos plastic wood newsletter
- Newsletter Kosmos
- Korean Wave Newsletter
- Newsletter fluted panel Kosmos
- Korean molding news
- Stone PVC Newsletter
- Laminate flooring newsletter
- Egger laminate flooring newsletter
- Galamax laminate flooring newsletter
- Kosmos laminate flooring newsletter
- Povar laminate flooring newsletter
- Robina Flooring Newsletter
- Newsletter Thaixin laminate flooring
- Plastic floor newsletter
- Newsletter plastic wall panels
- Newsletter of bamboo charcoal panels
- Bulkhead newsletter
- agents
- Accessories consultation
- Wiki - Interior and exterior trends

Kosmos plastic wood newsletter
3m plastic wood flooring: Benefits, collections, installation methods

Kosmos plastic wood newsletter


